I’ve heard from a lot of amateur photographers, either just starting out or people that have been doing it for years, that they can’t get their head around aperture, ISO and shutter. These are very simple changes you can make to improve your knowledge and control of your photography and should not be ignored and passed off as “for professionals”. Here’s 5 simple guides to remember, then I’ll go a little more in depth but still easily understandable:
1. Keep your ISO as low (100-200) as possible for higher quality images.
2. To keep the same exposure, halving your shutter speed (2sec to 1sec or 1/40 sec to 1/80 sec etc) means doubling your aperture opening (F11 to F8 or F5.6 to F4 etc) OR doubling your ISO (100 to 200 or 400 to 800 etc)
3. Wider aperture (lower F number) means narrow depth of field (blurring background). Smaller aperture (higher F number) means greater DOF (focused background)
4. At night, increase you ISO to keep shutter speeds fast, or use a tripod or rest the camera on a solid object.
5. To keep the same exposure, doubling your ISO (100 to 200, 800 to 1600 etc) means halving your shutter speed (2sec to 1sec or 1/40 sec to 1/80 sec etc) OR having your aperture (F5.6 to F8, F11 to F16 etc)
So first we need a simple way to understand the relationship between the three of them. All of them relate to the exposure of the photo you’re taking. Lets start with aperture.
Aperture: This is the “Iris” of the lens that is either a large circular opening or a narrow one. The wider open it is, the more light can enter the camera, of course. The lower the F number on your camera, the more open the aperture. F value is equal to the focal length of the lens divided by the entrance diameter. This isn’t something you’ll be calculating when taking a photo, but it does mean that F values are backwards and seemingly random. But this is a standard you can remember or at least consider when changing your F value or aperture. F1.4 is twice as big as F1.8 is twice as big as F2.0 is twice as big as F2.8 is…F4.0…F5.6, F8, F11, F16, F22, F32. Your camera will usually let you step between these values in thirds.
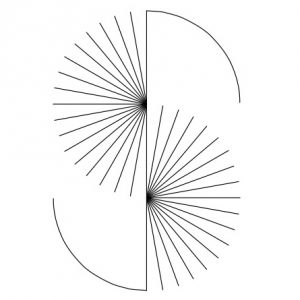
Why would this need to be changed? The main reason is depth of field (DOF). I’ll talk a bit about this because aperture is usually the main control photographers like to have when faced with different situations, and the other factors are left to automation. The focus of a picture relates to when points of light from what you’re shooting, are also points of light on the sensor. Light diverges from every point of an object in all directions, the camera tries to bring that diverging light back to a point. This is focusing. However, objects at different distances have light entering the camera at different angles so a lens cannot “bend” the light from different angles at the same time, it would have to re-focus on the other object, potentially blurring the original object. But enough words, I find pictures make more sense, which makes more sense being a photographer. Make sense?

In this diagram, the “object” is in focus on the sensor. The top series is with a open aperture (lower F number), the bottom with a more closed aperture. The “background focal point” is just showing where the sensor would need to be for the background to be in focus. As you can see with the top series, every point of light from the background is much much bigger than a point. All these big circles would just blur into a big mess, as you’ll see if you take a photo, for example, of a person with an open aperture and a distant background.
In the bottom series you can see that the background focal point is the same, but the size of each point of light on the sensor is much smaller. By comparison, this background image would be much sharper than the image above.
That’s a simple way of looking at it and understanding how aperture affects the focus of objects at different distances. It’s not hard to picture that in the bottom example, a larger range of distance around the object would be in focus than in the top example. The greater this range, the greater DOF. This is why a wide and open aperture gives you a “narrow DOF”
Shutter speed: This may be a little easier to understand. This is how long, measured in fractions of seconds or whole seconds, that the sensor is exposed to light. If you halve the time, you halve the amount of light coming in. Double the time, double the light. I’ll save the effects of long or short exposures for another time. I’ll just focus on correct exposure here.
ISO: International Standardization Organisation. I know I know but just leave it at ISO and let’s move on. Most people refer to this as the sensitivity of the sensor to light. The higher the ISO, the more sensitive your sensor is to light. Although, with digital cameras, it’s more accurate to call it a light multiplier. The sensor doesn’t suddenly “feel” more photons hitting it. It just turns up the gain and shouts louder with they hit. This increase in the ISO produces “noise”, an increase in random pixels of colour and light which can ruin the cleanliness of your photo. But also not a topic we need to go into here.
That’s the basic understanding you need before changing these settings around on your camera. Because they all relate to the amount of light your photo will display, they are all connected in a simple and special way. Assuming you have a fixed exposure you want to work with, change one setting, and one or both of the other settings will need to change too. Here’s a simple diagram to show where all the light in the photo is attributed to:
![]()
Colourful isn’t it? Let’s mess with it. Let’s say we’re taking a photo of someone because they have a handsome face, and it’s a sunny day. We’ll use me as an example even though it’s irrelevant to what we’re talking about. You’ll probably want to blur out the background to emphasize on me as the subject, so you’ll increase the aperture (lower F value eg 5.6), decrease the ISO because you don’t want noise and there is plenty of light. Make the shutter speed quick because I fidget and blink a lot. The diagram would look more like this:
![]()
Same exposure with different values. What about a landscape on a sunny day?
![]()
Notice the ISO didn’t change because I want to keep the noise down. I wanted everything to be in focus from the foreground to the background so I needed a narrow aperture (higher F number eg 22). This meant I had to decrease the shutter speed (an increase in time).
But what if that person with the handsome, blinky, fidgety face is out at night and I still want to get a good exposure, but you’ve opened you aperture as far as it will go? That would mean exposing the camera to more light with a longer shutter speed, potentially blurring the whole scene. Or:

Increasing the ISO would allow you to keep a faster shutter speed while still exposing the photo more.
I won’t make diagrams for every scenario you’ll be face with. That’s for you to decide.
So how do you know if the exposure is correct? I’ll talk about the histogram and the different exposure options on your camera next time.
Just remember:
1. Keep your ISO as low (100-200) as possible for higher quality images.
2. To keep the same exposure, halving your shutter speed (2sec to 1sec or 1/40 sec to 1/80 sec etc) means doubling your aperture opening (F11 to F8 or F5.6 to F4 etc) OR doubling your ISO (100 to 200 or 400 to 800 etc)
3. Wider aperture (lower F number) means narrow depth of field (blurring background). Smaller aperture (higher F number) means greater DOF (focused background)
4. At night, increase you ISO to keep shutter speeds fast, or use a tripod or rest the camera on a solid object.
5. To keep the same exposure, doubling your ISO (100 to 200, 800 to 1600 etc) means halving your shutter speed (2sec to 1sec or 1/40 sec to 1/80 sec etc) OR having your aperture (F5.6 to F8, F11 to F16 etc)